

“Twiggy” a 2004 Suzuki DR650 SE
12/03/2011

As I bought it November 2011
Meet ‘Twiggy’. Why is it called Twiggy? Because it’s a lot thinner than my BMW R1200GSA as well as well as being a lot thinner than my previous bikes. The BMW really is a lovely bike but it’s going to stay in North America where it can be fixed easily if it breaks down. There aren’t too many BMW “doctors” where we’ll be going. The simplicity of the DR and also Ulf’s XT600 (please see his bike build at www.rtw2013.com) make them an attractive choice for crossing Mongolia and Siberia where there aren’t too many motorcycle garages. Also they are a LOT lighter and we’re not getting any younger (at least our bodies aren’t anyway) so when we crash, drop or stall them …which I’m sure we will, they should be a bit easier to deal with. Oh yes, the parts are a lot cheaper too. All that said, I’m considering the following for the DR:-
1. Upgrading the stock suspension front & rear. The factory stuff is very soggy and needs to be stiffened up a lot. I am currently looking into Cogent Dynamics rebuilding my rear shock absorber and sending me the DIY kit for my front forks. Remember, we’re doing a lot of rough roads on these bikes.
2. Replacing the existing fuel tank with a 6.9 gallon Safari Tank. It’s nice to have the range if you need it. Also, you don’t have to fill it every time if you’re just travelling between towns.
3. Replacing the seat. I’m entertaining the idea of buying the DIY kit from ProCycle USA. It looks fairly comfy and you can fit it to your stock seat pan.
4. Wider foot pegs. Need to be able to stand for a few hours every day and don’t want to kill my arches!
5. Small windscreen. The DR doesn’t have one but once again, ProCycle sell one that you can attach to the headlamp cowl without too much bother.
6. Fork brace. I don’t want the front end flapping about like a rogue supermarket trolley wheel on gravelly and rocky roads. I think the Happy Trail fork brace will be the one because of its simplicity. I also like the fact that it bolts together and thus can be fixed if I can find a welder.
7. Handle bars. The stock ones are a bit weak. Fortunately my friend Grif came over the other day and gave me a set of Moose racing bars complete with brush guards and….
8. A bash plate for the engine (see photo below). Thanks Grif…. I really owe you big time!
9. He also gave me a magnetic oil drain plug too.
10. Heated handlebar grips. I got spoiled having them on the BMW and now can’t live without them! I don’t like the idea of a heated grip being mounted to a plastic throttle sheath though.
11. Aluminium throttle sheath.
12. Happy trail Pannier kit & rack. I like the Happy Trail product and it faired well on the trip last year on my BMW. The new ones will be a either 71/2 inches wide or 9 inches wide. That depends on how much stuff I intend to carry.
The list I have is almost endless but I really don’t want to bore you too much at this point! The items listed above are there for starters so watch this space to see how I get on with buying and fitting.
Priority #1. I need to raise the bike on its suspension though. Somewhere in the last 7 years, someone lowered it by the factory method (upper bolt hole on the rear shock absorber and spacer removal of the front forks) photo below. December 2011…..I need to find somewhere to work on the bike because at present I have no garage, live in Canada and it’s WINTER! So, if you’re in the Canmore area and want to donate a bit of space to a quiet reserved guy who just wants to strip his 650 down and make your premises look like a yard sale then please contact me 🙂 Please watch this space for more updates. Also please feel free to offer advice on the bike stuff or critique my blogging style if you want.
Canadian winters
03/10/2012
………Are a good time to work o n your bike…….just don’t expect to ride it for 6 months! Please bear with me as this post, will be a bit technical but if you’re reading this because you want to prep your DR650 there might be some useful info. Christmas came and went in the blink of an eye and before long I was back working on the DR. The first task was to fit the bash plate, new handlebars and MSR brush guards. My choice of hand shield was basically the biggest lump of plastic I could find to bolt onto the brush bars. MSR provide such a thing and so far they have certainly managed to keep the cold winter winds from freezing my hands.

The engine bash plate was easy enough to install and during this process I drained the oil, installed a magnetic drain plug and put some cheap oil back in. Why cheap oil? Basically i will run the engine for about 1000 kms and drain the oil out again to see what state it’s in. By inspecting the magnetic drain plug I should get an idea of how the engine is wearing.
Rear shock absorber. There are many products out there for the DR. I chose to go with a Cogent Dynamics rebuild and restore the bike to its full factory height in the process. The turnaround time for the rebuilt shock was a couple of weeks and pretty soon I was back in the workshop installing a shiny new item that I hope will stand the punishment of Mongolian roads and the Road of Bones with me and luggage on board.


Old shock absorber (picture above) …note the two holes at the base on the right. This is the factory way of lowering the back end of the DR.
Shiny, new and with some extra adjustments added in lovely anodized red (picture below). Basically it was fitted with a new gas bladder, Cogent’s own internals and an 8.1 Eibach spring. According to Rick at Cogent this will be good for me (185 pounds) and around 70 pounds in luggage, tools, tyres etc.


Front forks. Hmmm…..what to do. The front end is way too squishy and dives heavily under normal braking. I’ve spent a lot of time on forums recently, especially the DR forum (DRRiders) and there appears to be a growing fanbase of Intiminator users out there. Ricor Racing Intiminators are basically a valve system that one can install without having to remove or drill out the dampening rod. Just install under your spring on top of the damper rod and screw it all back together again. Fill with 5W oil and ride. Actually it’s not quite this easy because you really should set up your preload according to your preference by manufacturing and sizing up spacers on top of your springs too. Many people claim that you don’t need to replace your stock front springs for this either. I will give this a try….watch this space for a report.


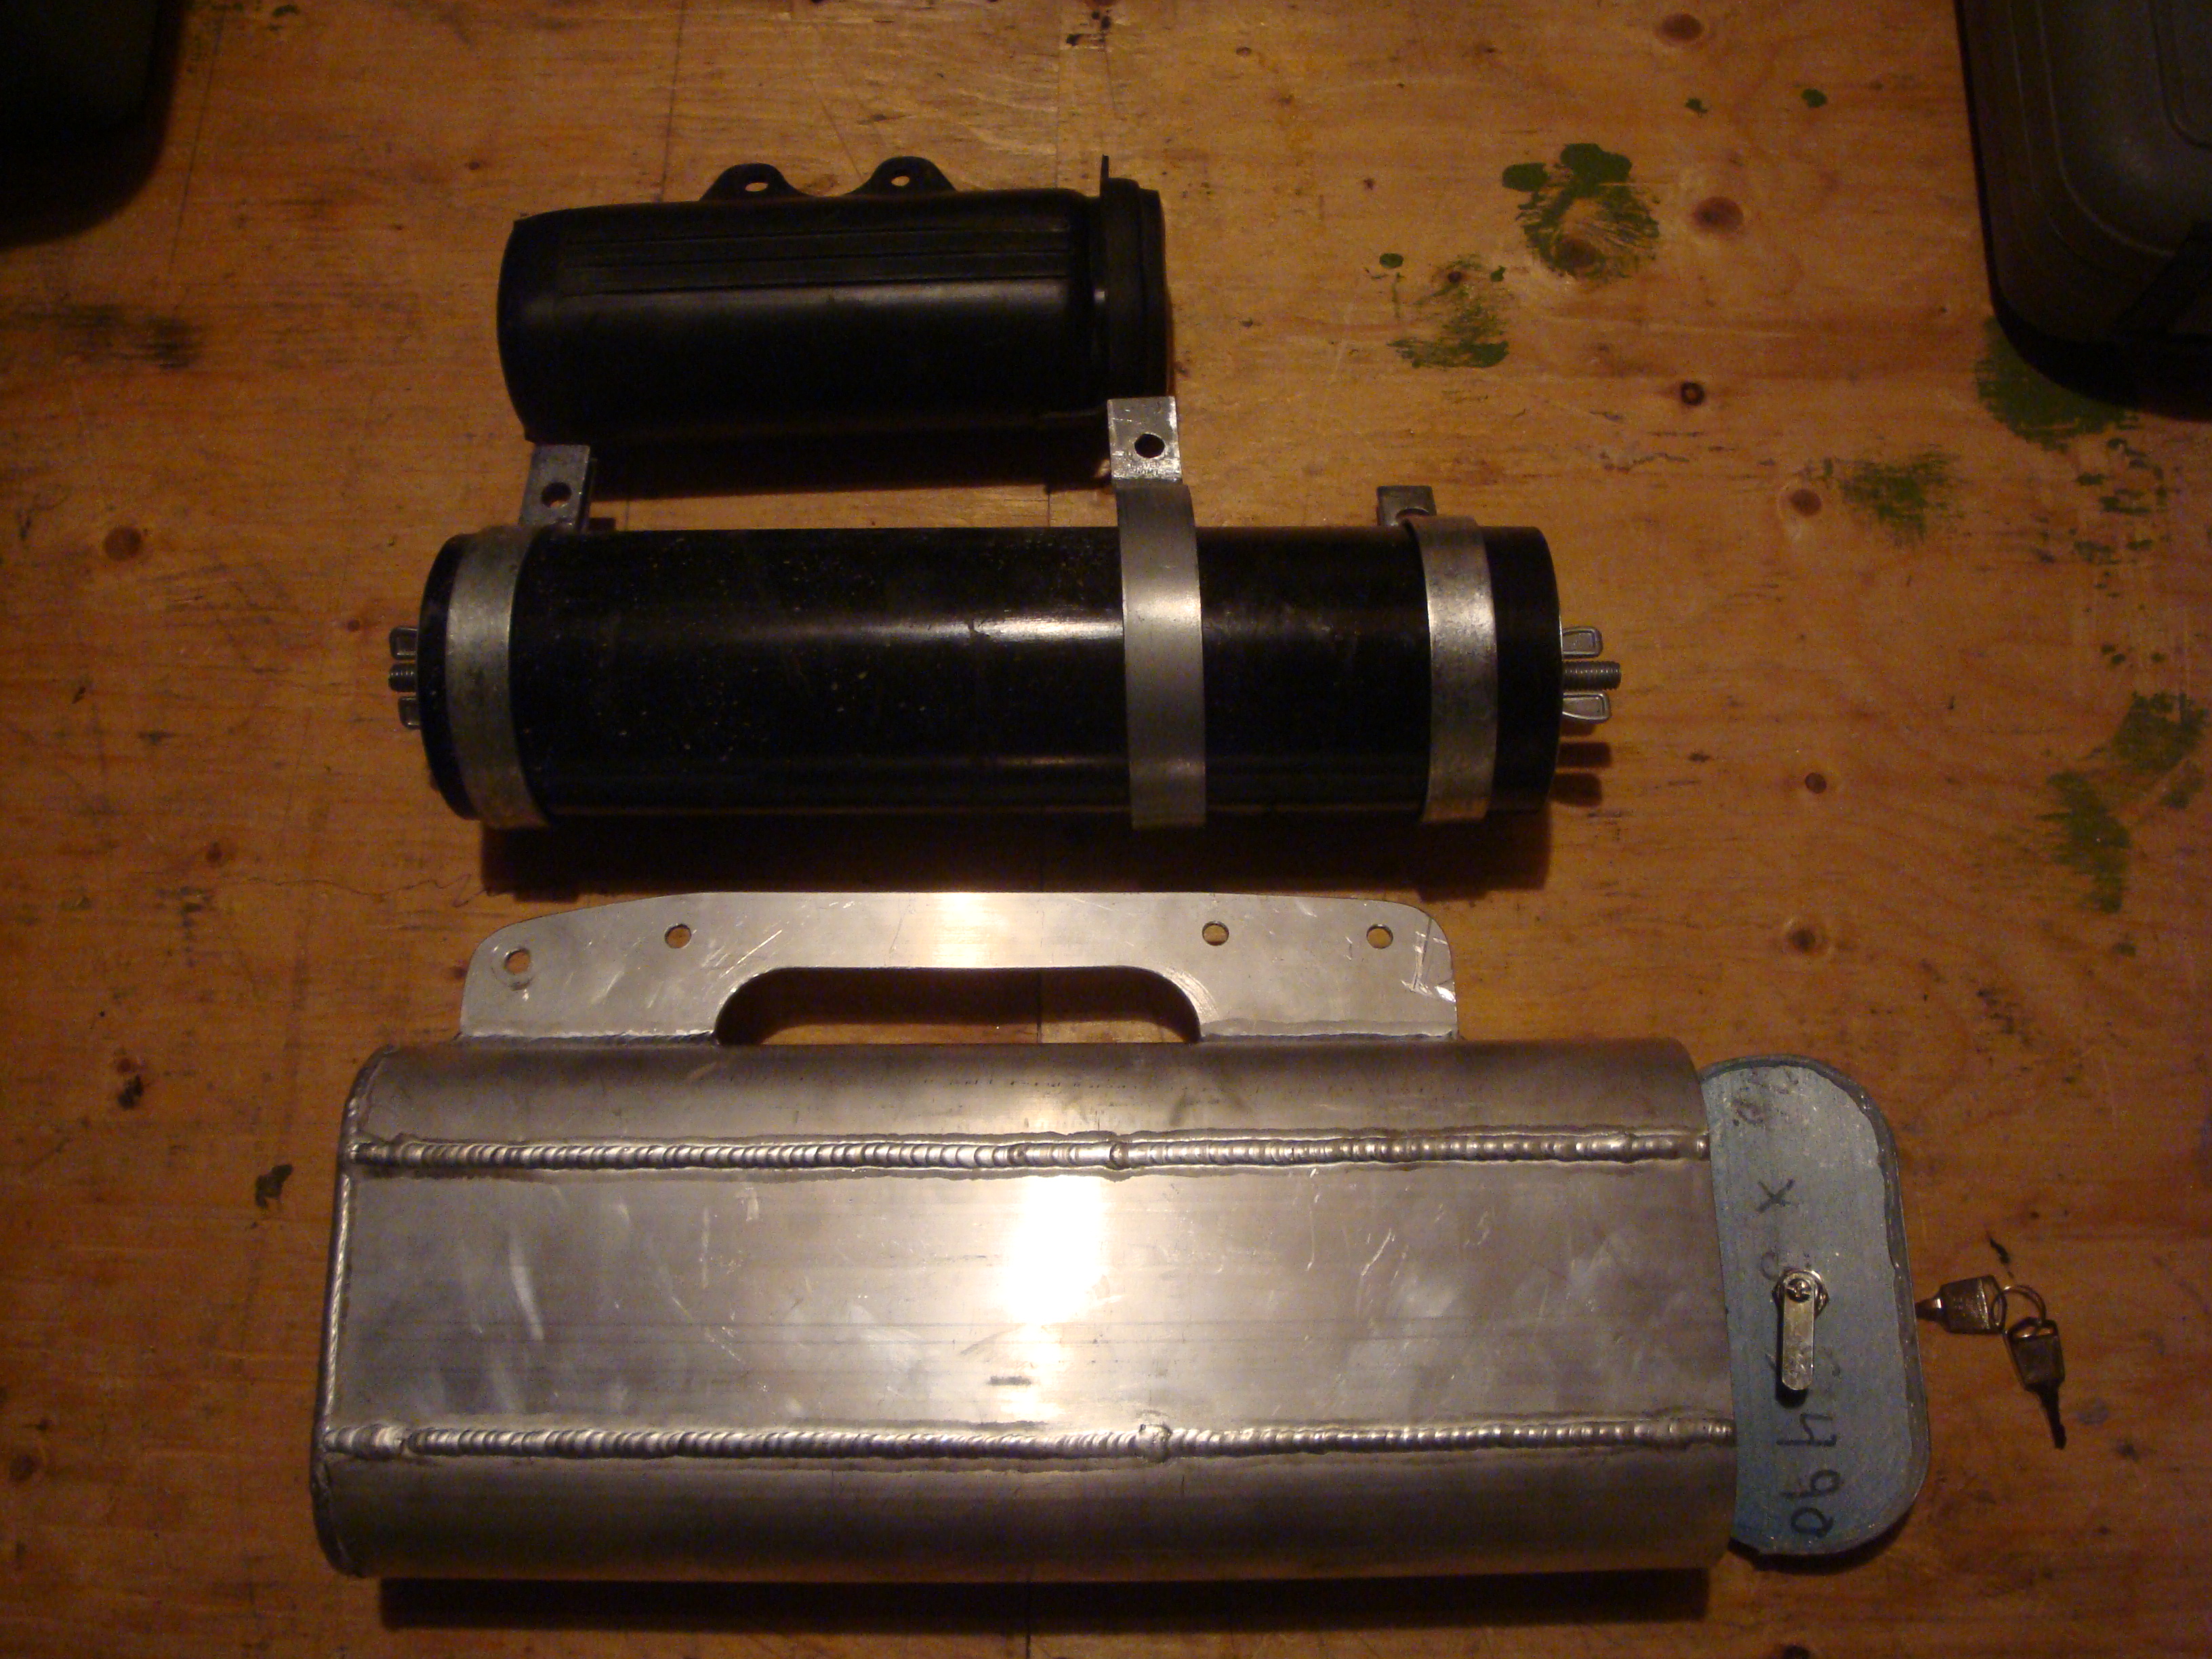
Tool tube. I built this a few weeks ago from some 3 inch PVC pipe and two pressure bungs. The idea was to fit it in place of the existing stock tool tube to gain more carrying capacity. Everything was going well until my mate Grif bought me a new shiny alloy tool tube for doing some renovation work at his house. I will be fitting this new item very soon! Stock Suzuki tool tube at top. My home made tube in the middle and the cavernous new storage at bottom!
At this point, I took some time to look at the rear subframe on the DR and elected to weld a strengthening piece on either side to prevent the frame from cracking under load on washboarded roads. Also, the new tool tube would prove to be a lot heavier than the original factory tube so I had to make up a bracket to hang this from too. This was a simple task when the bike was apart. (photos below).


Grip Heaters. Yup… I need them. For the longest time I considered Oxford slip on heaters but in the end I went with Happy Trail’s kit. This includes a set of heaters, a toggle switch all the wiring and a free set of gel grips. I also elected to buy an aluminium throttle tube to replace the plastic one on the DR. I did this for two reasons,1. I didn’t want the new heaters melting the plastic of the stock tube and2. Suzuki glue their grips on with REALLY strong glue. I’d rather lose my sanity in a more complicated way…not wrestling with a set of cheap grips!

Wheels. The DR is famous for eating the rear sprocket bearing. Basically it’s a combination of a nasty OEM bearing that only has one dust seal on one side and the cush-drive rubbers wearing and getting sloppy. My advice…replace the rubbers with new and install a bearing that has a dust seal on both sides. Don’t forget to pop the dust seal on one side, pack it full of grease and replace the seal again. Bearing factories are very miserly on their grease application. All wheels were fitted with new double sealed bearings (factory ones only have one seal on one side). You can actually take the old seals out of your used bearings and press fit them to your new ones if you purchased stock bearings. The rear wheel also got a new set of cush drive rubbers. Evidently there are reports of the rubber absorbers failing around 25,000 kms but I have yet to experience this on Twiggy.


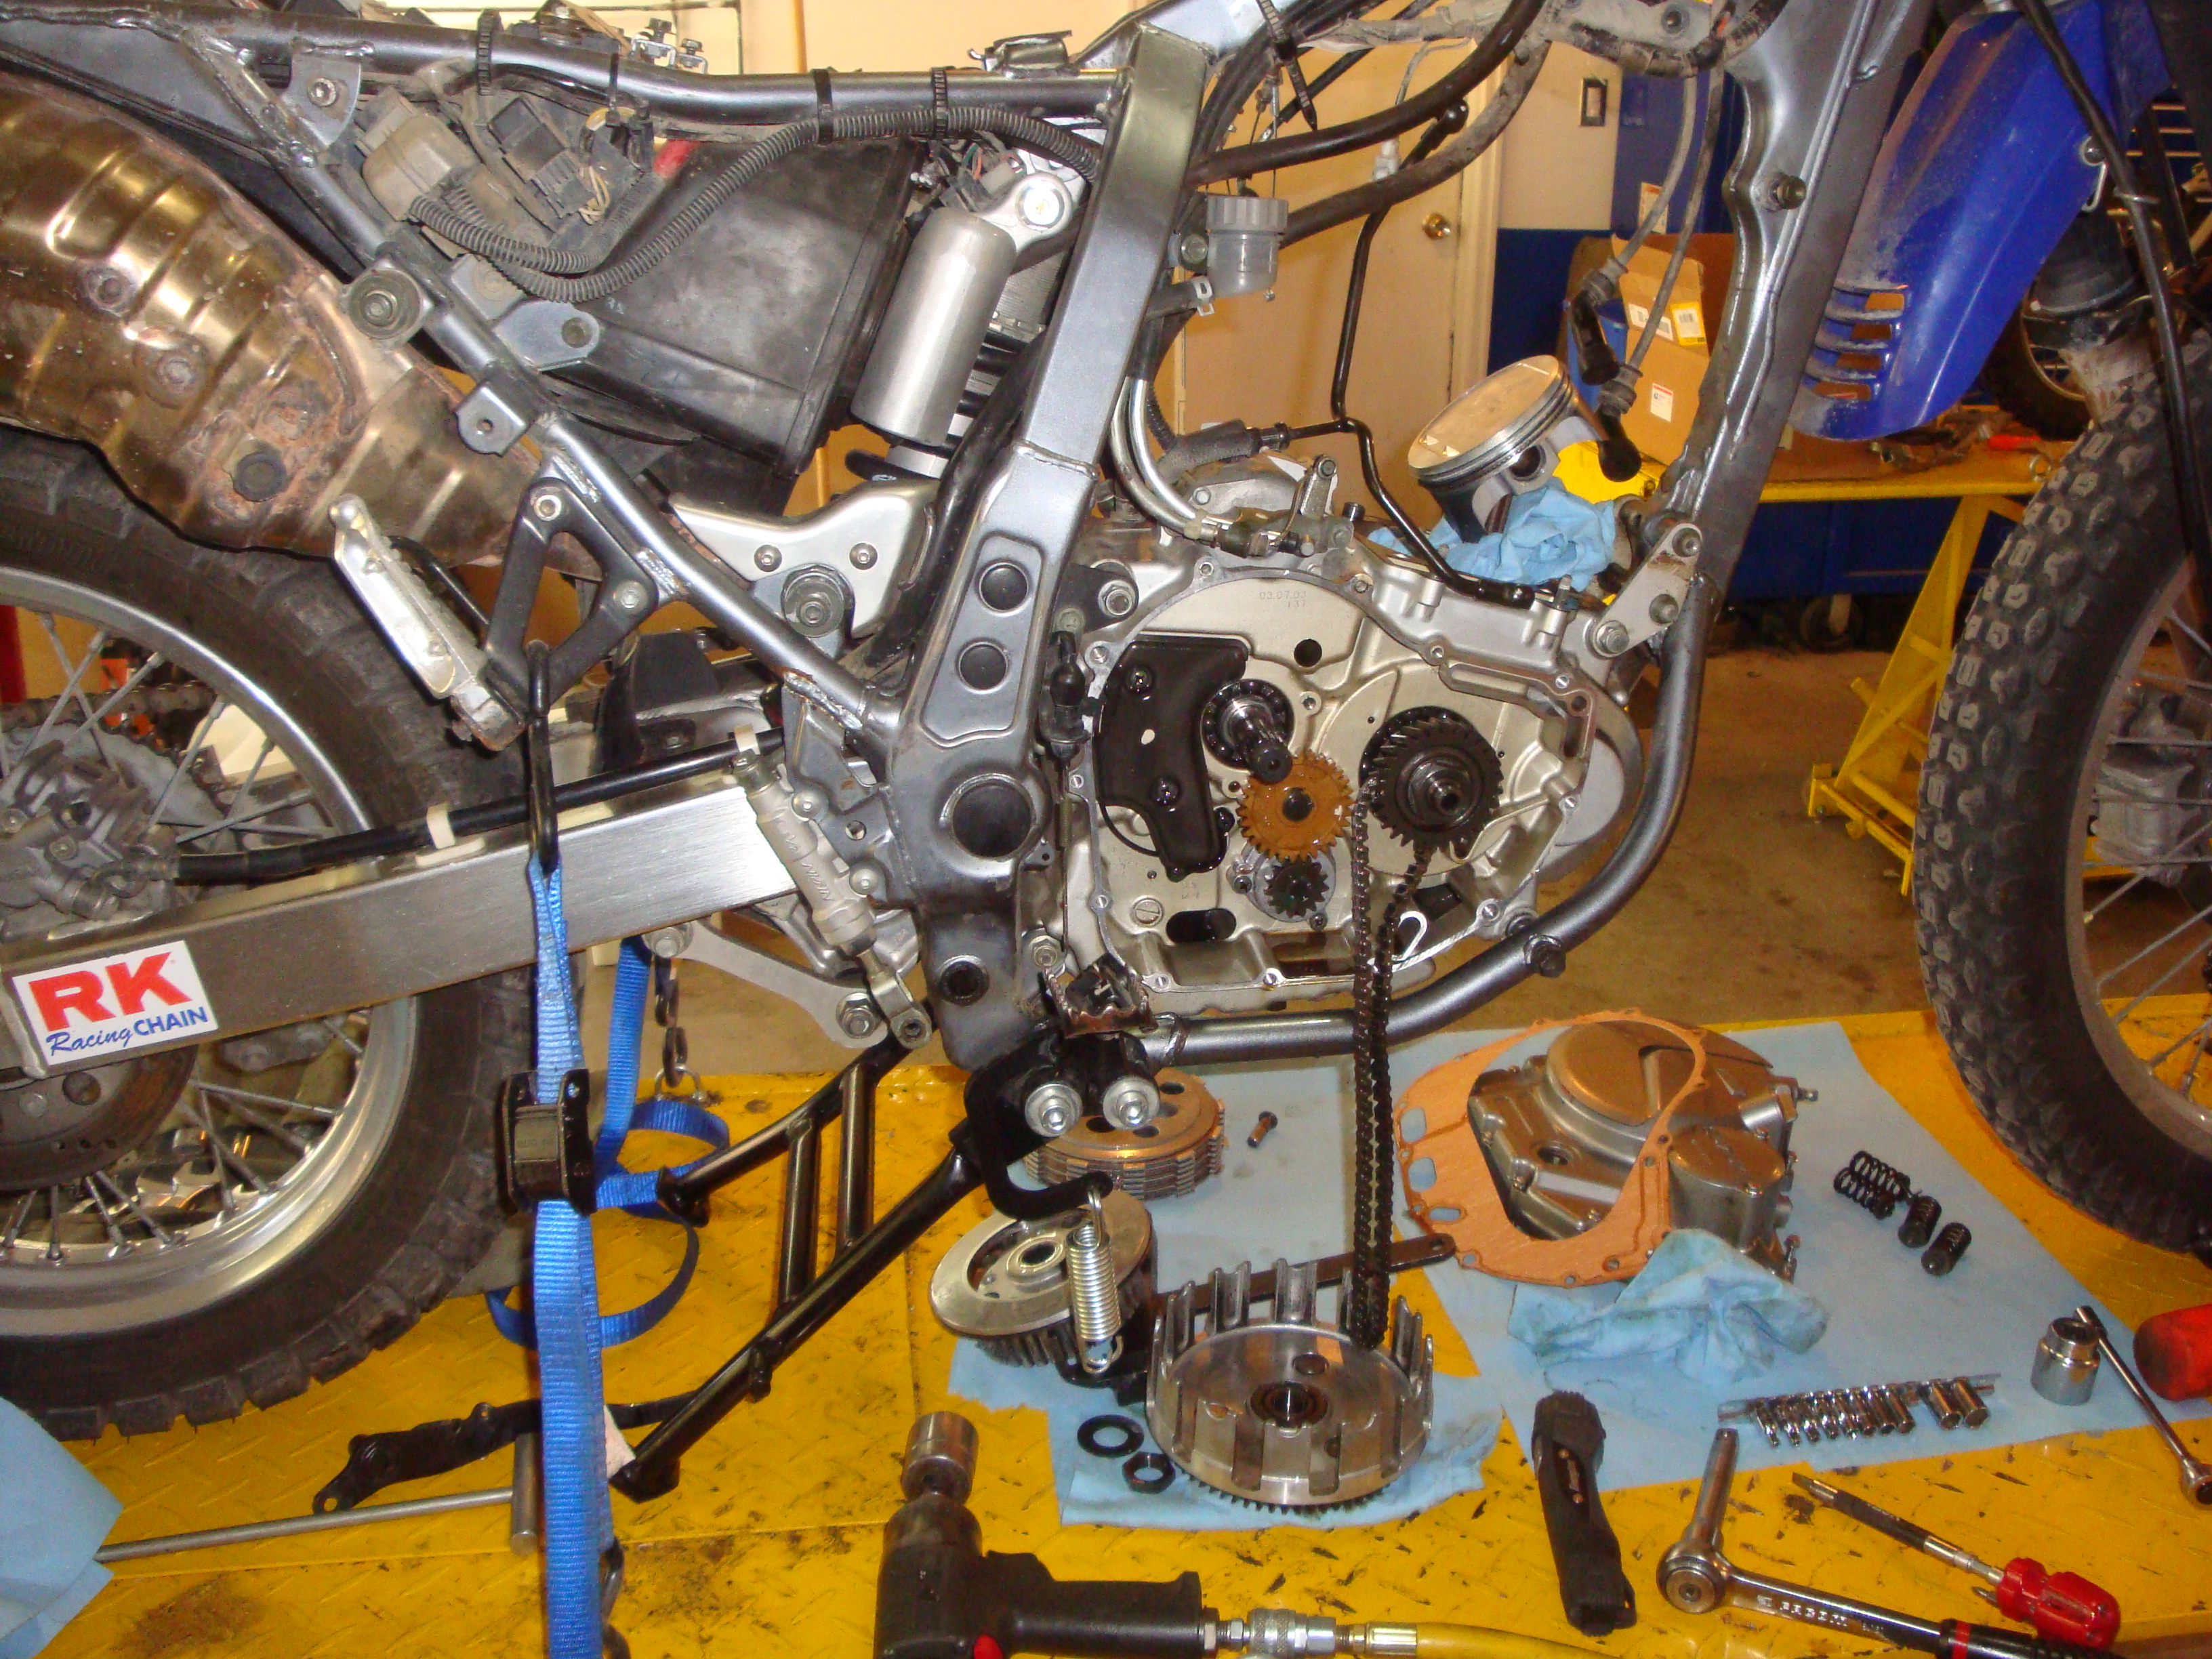
Engine time. Once I was satisfied with the rolling chasis, it was time to set about the engine. I needed to make sure the motor would last the journey. My rule of thumb here is this….don’t bore out or modify an RTW engine so much that it will need specialized parts or an oversized piston or rings. You might be waiting a long time in a far flung land for these parts to come when you could have bought stock parts much closer to your location.
Now, on with the tear down. I elected to use a stock piston and ring size but replace the piston with a Wossner forged piston (stronger and less likely to warp under heat). Fortunately the bore was hardly worn. Suzuki use a Nikasil coating on these bores…they might as well be diamond coated. I dropped in a new cam chain, tensioners and elected to put in a carbon fibre & steel clutch with stronger clutch springs because of the luggage load I was intending to haul (this proved unnecessary in hindsight and a stock clutch would have done the trick so don’t waste your money if you’re reading this). I also bought the jet kit from Procycle that calls for the stock carb slider to be drilled out, a larger main jet installed and the airbox opened up. This was a very good decision and Twiggy was finally aspirated properly! To compliment this carb kit, I installed a Suzuki GSXR 1000 titanium can and mid pipe from Keintech (as of 2016, I don’t think they produce mid pipes any more but you can get a Procycle version off the Procycle website).


I Also fitted a heavier duty stator from Procycle. It was necessary if I was going to use the grip heaters a lot because the stock one is a little under powered. I did purchase a heavy duty regulator/rectifier too but that failed after 10,000 kms and we installed a used one from a GSXR 600 in Kazakhstan. Twiggy is still using this set up today after 156,000 kms.

Toggle Switches. The heated grips come with a toggle switch to control them. I also want to install a toggle switch that will cut the power to the headlamp and save generator time when I need to run the heaters and charge stuff like camera batteries etc. There’s not a lot of room behind the small fairing for this so I’ve elected to mount a small plate to the left handle bar clamp that will contain these switches. see below. I have a feeling I’ll be revising this design but for now it will do.

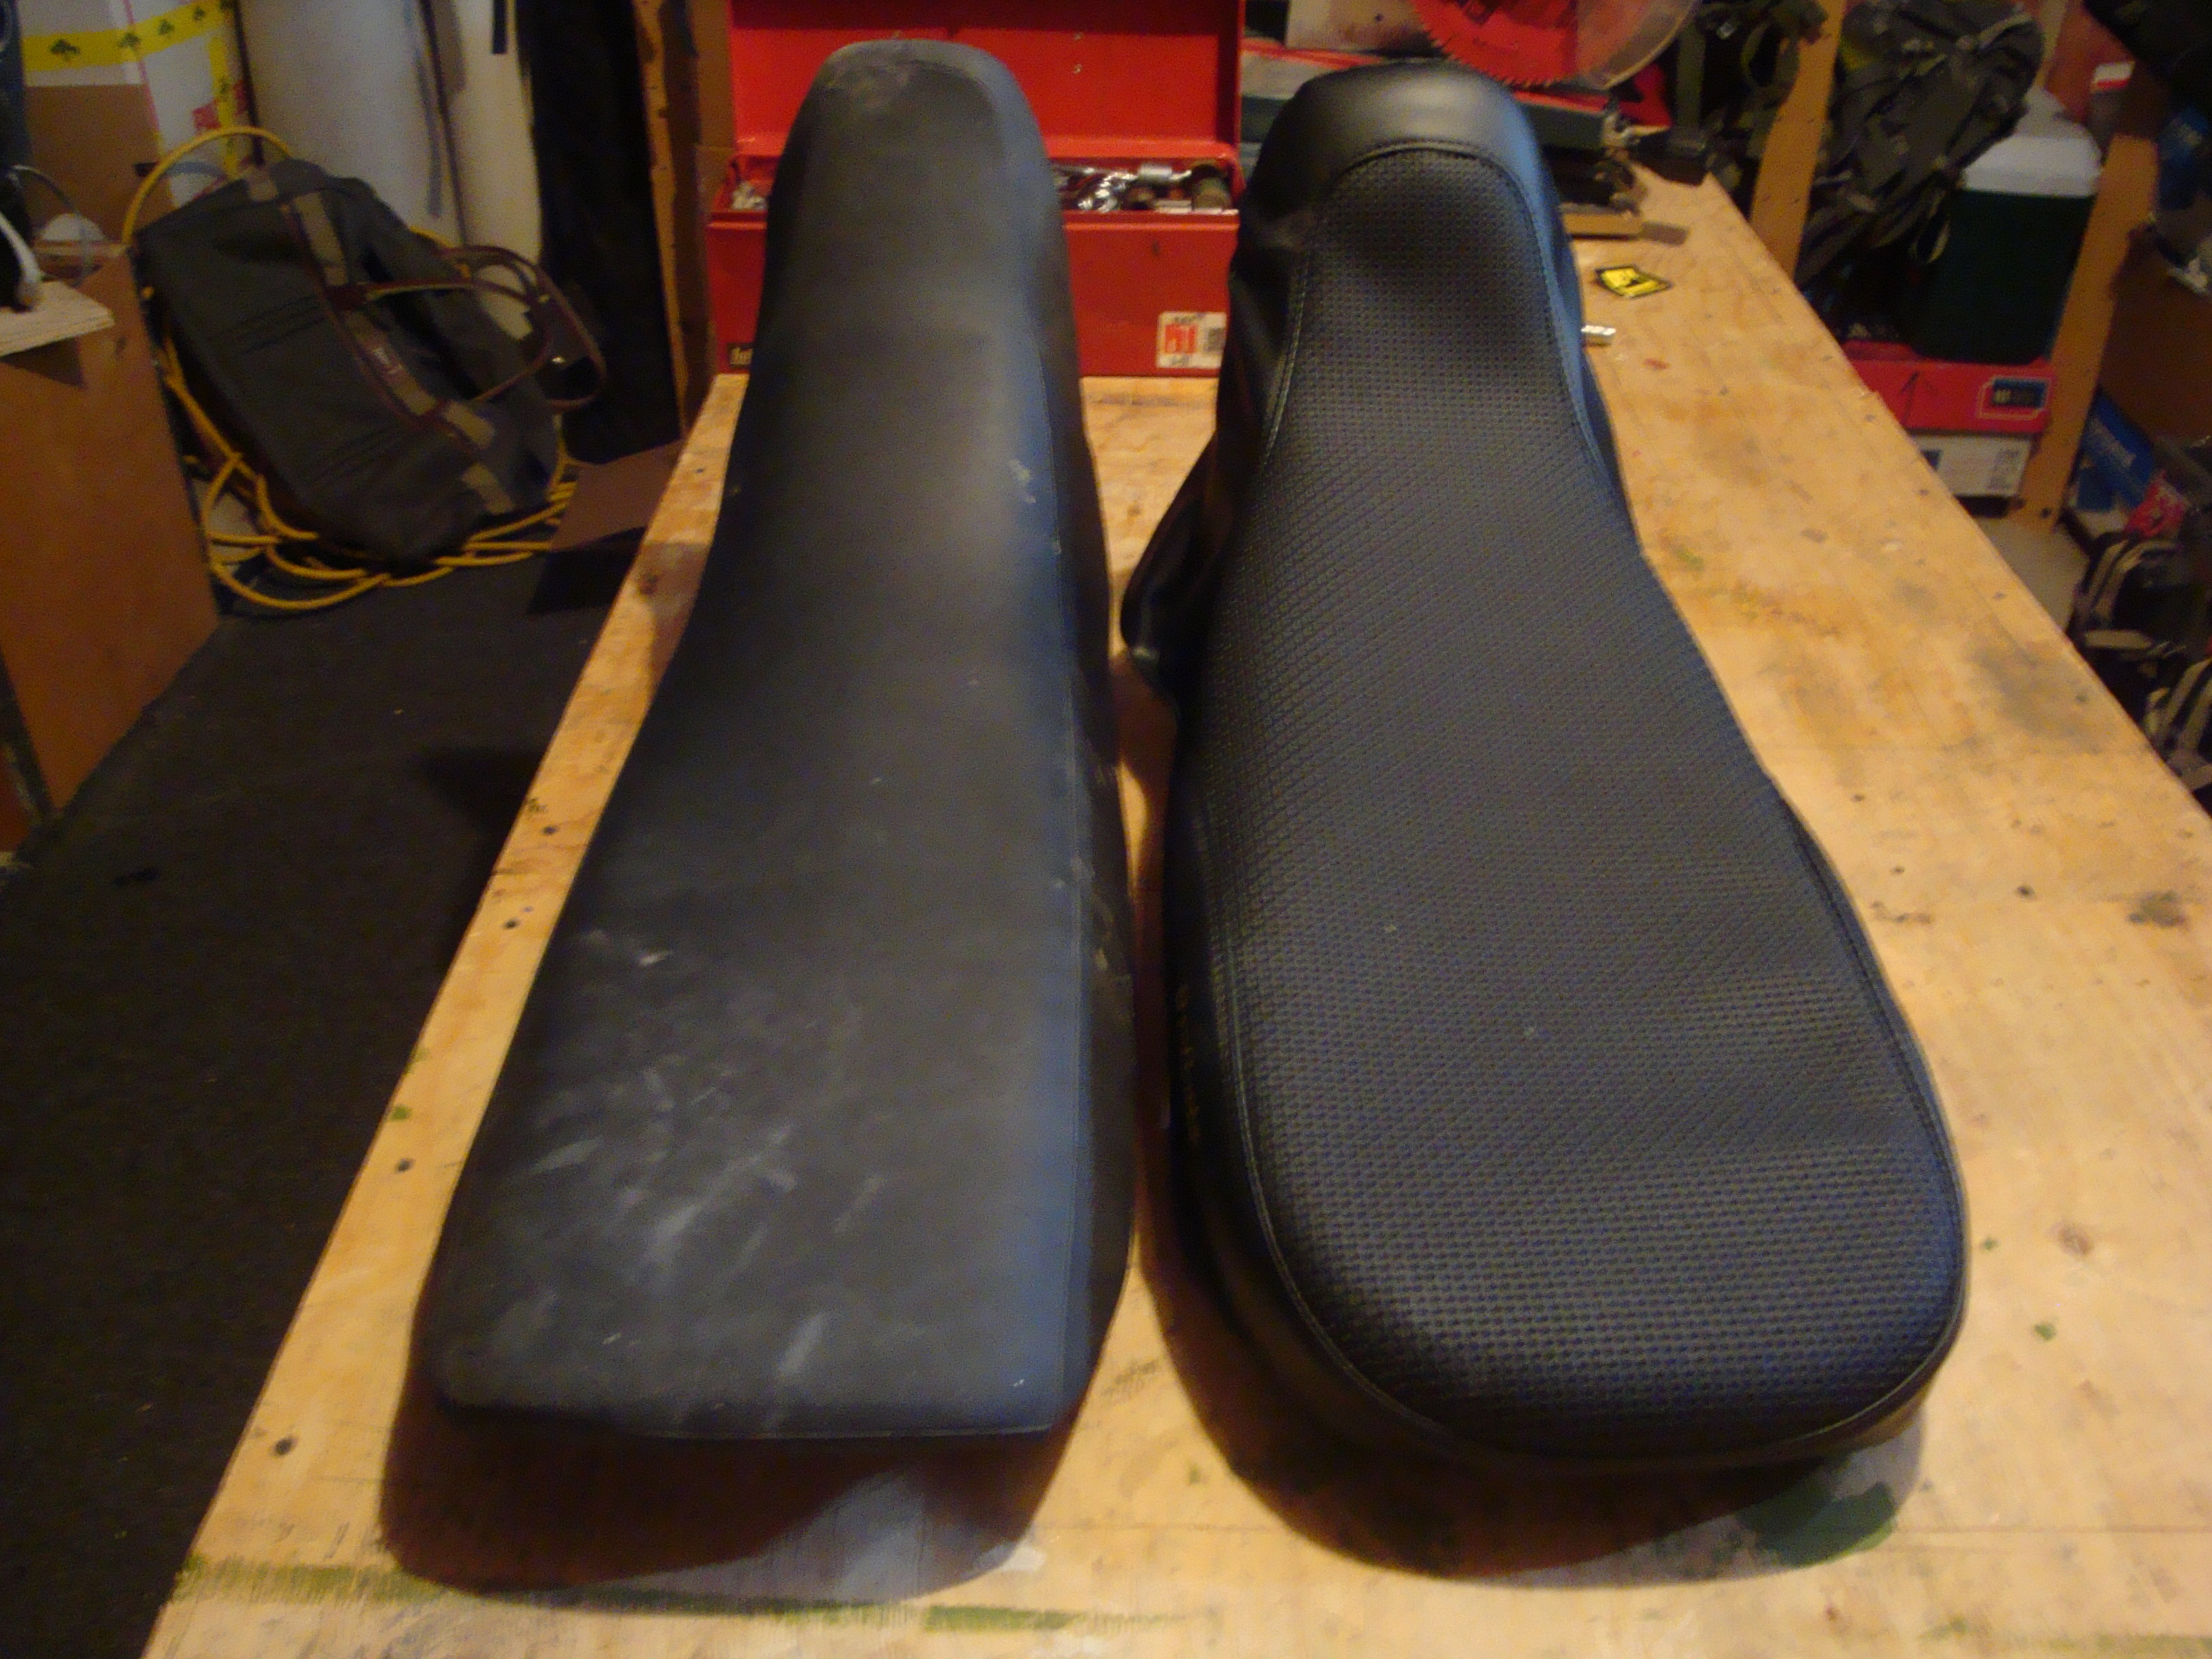
Seat. Well, it doesn’t need saying really…..I had to change out the stock seat with a Procycle Saddlemen kit. The stock seat will cripple you on a long journey so consider your options carefully here. To begin with, my Saddlemen seat was pretty good but over time, the gel hardened and I’m now considering buying a Corbin instead…..like my buddy Grif has, the smug git 😉
The finished product?
01/14/2013


Hi folks, Well it’s been a while since I added some material to the website. The month of February has been very busy for me with all the final preparations for Twiggy and plans for flying her out of Calgary to the UK to start the trip. Wow! I cannot believe the rules and regulations that have now been imposed on freighting a motorcycle recently. The paperwork is like doing a small degree. Anyway, last summer saw me receiving all the Happy Trail sponsorship stuff from Boise Idaho and then I spent the whole 2012 summer putting the panniers to the test on some of the most rugged trails through the Canadian Rockies. The results were good, it all stood up to the test so I feel confident that I have the best product for the task at hand. The winter was a different story entirely. I spent my time stripping Twiggy down and working on all the little items that needed attention. For example, I needed to install a fuse block panel under the seat to power my grip heaters, LED spotlight, accessory cable and charging indicator light.


This in turn was switched by a relay that is activated/triggered by the rear license plate light when the ignition key is turned on. This means that no accessories will turn on unless I turn on the ignition switch. Battery drain minimized 🙂 I also drilled into the top box on the bike and ran a power cable through to the inside, silicone it all up and now I can charge all my cameras and laptop in a dry environment using a cheap inverter.
After adding a heavy duty rectifier from a DL650, the output is sufficient to charge my 45 watt laptop, run a 65 watt headlamp bulb and grip heaters well.I also received a very generous offer of sponsorship from MOTOVAN.COM. These guys do everything for power sports and so within a few weeks I got tires, chains, sprockets lube tools, air filters and filter skinz delivered to my door. All parts have now been fitted and tested. I particularly have to sing the praises of the filter skinz. They negate the need to oil your air filter and thus you can wash /replace both skinz and filter with ease.

Along the way, a decision was made to fit the Suzuki GSXR1000 Titanium silencer to Twiggy. This was a discussion between myself and buddies Grif Griffith and Jim Smith. I wasn’t convinced this would be the best for Twiggy because she had performed so well over the summer with the standard exhaust and jetting and I didn’t feel the need to change anything that wasn’t broken. Jim and Grif convinced me otherwise stating that many people had already done done this conversion and no one had experienced bad results. So…..Twiggy is now fitted with a Keintech midpipe, titanium can and a 1.55 main jet in the carburetor (I believe stock is 1.44).


The top of the airbox needed to be cut out as per the jetting instructions (they actually give you a template at ProCycle). I didn’t like the idea of the open airboxbeing totally open to all the dead moths, dried leaves and beetles that could potentially get in there so I siliconed the edge and adhered a piece of mosquito mesh to prevent stuff from getting into the airbox.“but what about water getting in Nevil….how are you going to cross rivers?” Simple. If the river is too deep and has a likelihood of going over the top of the airbox I won’t go through the river at that point or will find another way of getting Twiggy to the other side. I’ve done it before and will do it again 🙂 Last weekend saw some very mild weather for a Canadian Winter and the snow melted off the roads well enough for me to go and test the newly built Twiggy out on the open roads.Wow! What a difference the exhaust and jetting made! This, coupled with a 16 tooth front sprocket made highway riding seem very easy.

The Doubletake mirrors do vibrate when starting out and going through the gears but settle down to normality once you’re up to speed. Mirrors on a thumper will always do this to some extent anyway. Personally, I really like the Doubletake mirrors because they are fully adjustable and will fold in if you take a spill. My home made windshield extension appears to work quite well. I rode the 35 kms back home against a high wind and nothing folded in or flapped around. More testing is required before I commit to this size of extension though. I will naturally give you a report on fuel consumption in a few weeks when I fill up and go out for a long day. Conclusions:- Everything I set out to repair and make ready has been done. The bike appears to be running well but will need more testing yet before I’m confident that all the changes made are good ones.Watch this space for more news …………
Note: …Actually, the windshield extension didn’t work that well and I settled for a Wunderlich part that was expensive but worked way better.
Now it’s time to read my blog. This little bike actually rode around the world in 5 months and performed well…..enjoy the read!
So…what worked and what didn’t work. How did Twiggy fair up after 36,000 kms around the world?
01/15/2014

It’s been nearly four months since I returned from my Round-the-world motorcycle ride and about time I shared some thoughts and facts with you about the bike:-
· I never did fit aftermarket “wide” foot pegs. The originals worked just fine….even when standing for hours on the dirt sections. My advice is to get a good pair of boots with a steel shank in the sole instead.
· The ProCycle saddlemen seat was ok and certainly more comfortable than the stock seat but I can’t help thinking it was still quite hard. Maybe this was because I spent so many hours in the saddle per day but I just wanted something a little softer after the first 25,000 kms. I bought an Airhawk seat for the ride across Canada and never regretted that purchase.
· A set of Intiminator valves and .5 over progressive front springs in the front forks worked out very well for me….even with a full 6.9 gallons of fuel in the Safari tank.
· The toggle switch that I installed to disconnect my headlamp vibrated apart in Kazakhstan. It serves me right for buying cheap stuff from a big brand hardware store.
· The power to the top box idea worked well but I found that carrying all my electronic stuff up high made the bike feel too top heavy. Ultimately, I kept my laptop, gopro gear, Nikon and lenses all in one side pannier and only placed one electronic item at a time in the top box to charge.
· The heavy duty regulator didn’t make it to the 10,000km point. It gave up outside Karagandy in Kazahstan where we soldered a used GSXR600 regulator in place. The bike has never had any other electrical problems.
· The Shorai lithium battery is incredible. I still can’t fault it. Ok ….maybe the terminals appear to be a little weak and bendy to me.
· My home made windshield extension stayed at home. It was too cumbersome. I did purchase a little deflector that worked very well though. See below.
· The Happy Trail highway pegs were incredible. They allowed me to stretch out my legs on long journeys thus allowing me to ride further once in a while. Don’t fit them if you are intending to ride heavily rutted roads though…..for obvious reasons.
· The only wheel bearing that failed was on the opposite side of the rear sprocket. It took me a half hour to replace. It happened 1000kms north of Vladivostok.
· The filter skins were perfect. I packed three pre oiled ones and used them all before Altai. After a quick wash and re-oil they were used again all the way to Vlad and into Canada. I changed out my Twinair filter ONCE in 36000 kms.
· The extra gussets we welded onto the sub frame held. I have inspected the frame for cracks and there are none. The bike carried about 75 pounds of luggage (including spare tires) and took everything that Kazakhstan and Mongolia could throw at it. ….even getting hit by a drunk driver in Kazakhstan.
· Why did everything major happen in Kazakhstan?
· Doubletake Mirrors…..are bombproof.
· Twiggy developed a small oil leak from the head gasket around the 25,000km mark. I think this was partially due to sitting in traffic jams in major cities in 30 – 40 degree heat. I won’t replace the gasket just yet though. I will run her in the mountains a lot this coming summer to see how far we can push this before it becomes necessary.
· I never got a single puncture.
· The GSXR 1000 Titanium can worked like a damn. With the airbox cut out and the re-jetting to 1.50 main jet Twiggy burned and breathed a LOT easier than a stock DR650. If you perform this modification just be prepared for some “popping” on overrun.
· If you are travelling with an XT600 use the stock 15 tooth front sprocket. I had to change mine over in the Ukraine because I found that I was using 4th gear more than 5th to stay at Ulf’s travelling speed.
In conclusion,
The DR650 was a good choice as a base for an adventure bike. There are so many aftermarket items that you can get for them in North America too. If I had to do the trip once again (and I REALLY wish I could) then I would certainly entertain the idea of a KTM 690 or a Yamaha XT660 because they are such superior machines on so many levels. Twiggy happily thumped her way around though and she is now part of the family. If you need advice, or want to send me advice or just want to say “hi” please use the contact form on the 9 minute moto film festival website to drop me a line. I would be honored.
Kindest regards
Nevil